
Monday, January 17, 2011
First Bulkheads in Place
The first two bulkheads are in place now. It got pretty cold (again), and I wasn't sure if the epoxy would kick. Put some heat on them for a couple hours, and fortunately the fillets firmed up. Before placing the bulkheads I cut notches on either side of the tunnel to allow for drainage.

Thursday, January 6, 2011
Eyes on the Prize
Looking back on some old pictures, I realized that I haven't fished much in the past year (primarily due to the fact that this boat build has consumed quite a bit of free time). Really looking forward to the day it hits the water, and I can get back after them again. Soon enough.
Dad and I in Ocean Isle:


Cousin Eric hooked up in Buzzard's Bay


Sneads Ferry Redfish

Cape Fear River Striper with Joe Shaw and Justin Whitley.

Dad and I in Ocean Isle:

Another OIB redfish

Topsail Island Redfish

Cousin Eric hooked up in Buzzard's Bay


Flounder gigging in Carolina Beach (or as Joe would say, "Flounder Giggity-Giggity")


Inside Glassed
On the last day of the 2010 year, the inside of the hull was glassed. Beau and a friend of his from ECU helped me out with it. It was a little stressful, and we exchanged some curse words and insults while we worked this time.
December 31st was one of the only moderately warm days we had in December (average temps in the day were in the low 40s, and it was getting down to the twenties at night), and so we really wanted to get it glassed on this warm day. However, I was low enough on epoxy to where we were all really wondering if there would be enough to finish the job. Really, the hardener was the real issue. The week before I pulled a fillet that didn't kick because of the low temperature, and because I used a medium curing epoxy. This time, to be certain, we only wanted to use fast cure. It was close, but we did have enough, and got it well saturated so that the peel ply wet out nicely. All's well that ends well I guess.


December 31st was one of the only moderately warm days we had in December (average temps in the day were in the low 40s, and it was getting down to the twenties at night), and so we really wanted to get it glassed on this warm day. However, I was low enough on epoxy to where we were all really wondering if there would be enough to finish the job. Really, the hardener was the real issue. The week before I pulled a fillet that didn't kick because of the low temperature, and because I used a medium curing epoxy. This time, to be certain, we only wanted to use fast cure. It was close, but we did have enough, and got it well saturated so that the peel ply wet out nicely. All's well that ends well I guess.

I also got most of the stringers and bulkheads cut out, and am glassing them now.


Tuesday, January 4, 2011
Cutting the Hull Sides
As was previously mentioned, the strakes looked really clean when I first put them down as bare foam (below)
 And they looked pretty good with glass on them too (below). But after I started griunding, I had to take them back to foam completely because of the voids.

So, after they were ground down, I reglassed with two layers of a lighter fiberglass that formed around them much more easily. I put down fillets of cabosil on either side as well in order to ensure there'd be no voids this time. I'm over grinding those things out!

There were some minor air pockets right at the chines in the aft section. Just to be sure I went ahead and ground those voids out, and also ground back a layer about two inches wide on either side of the chine in hopes that it won't cause me too much trouble come fairing time.

Once the boat was flipped Beau and I used a laser tool to line up the hull sides so that we could cut off the top couple inches to straighten everything out. Here's Beau taping off the transom. We left a 4 inch tab on the back so the outboard can sit higher on the transom.

I cut off the excess with a circular saw. It was a little scary taking a power saw to something that so much time went into.


Here she is after the hull sides were cut.

Monday, December 27, 2010
Hull Turning
On Monday, December 6th 2010 the hull was flipped. We put it on the back of a trailer, and moved it to the boat shop (my friend Beau was kind enough to allow me to build the boat from here on out in his shop instead of in the garage--what a huge help). Things will go quicker from here on out.


The inside of the boat is bare foam, but will get glass soon.


Thursday, December 23, 2010
Center Console
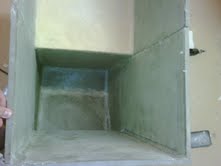
I also decided that this boat would have a center cosole and leaning post. I made the center console the same way I made the boat. I built a plug and covered it in foam, but I didn't glass it until I took it off the plug. The console didn't come off the plug as easily as the boat did though. I had to take the plug apart from the inside out.
Below is the wooden plug.


Below is the wooden plug.

I left off the panel under the dash that forms the toe kick hoping that would allow the foam to pop off the plug easily. No such luck though. It took me 3 hours at least to get this console off the plug.

I pulled fillets along the hard corners on the inside and then glassed the inside as well.


Grinding Glass...
The better portion my free time during the months of September and October of 2010 was spent grinding fiberglass. I burned the motor out of one mini-grinder, and moved on to the next one. I can't count how many times I covered the entire garage with fiberglass dust, sucked it all up with the shop vac, and then covered it right back up again.
As I alluded to in an earlier post, the strakes caused a significant amount of extra labor. I didn't pull fillets along the sides before the glass was laid, which was the problem. There ended up being little voids all along the edges of the strakes. I couldn't see all the voids through the glass, so instead of taking any chances I opted to just grind all four strakes back down to the substrate. This took around 35 hours to complete. Once it was all ground down, I used a lighter fiberglass to reglass it. There were also some voids along the chines, so I ground back both sides for the first four or so feet, and then reglassed this part as well.


As I alluded to in an earlier post, the strakes caused a significant amount of extra labor. I didn't pull fillets along the sides before the glass was laid, which was the problem. There ended up being little voids all along the edges of the strakes. I couldn't see all the voids through the glass, so instead of taking any chances I opted to just grind all four strakes back down to the substrate. This took around 35 hours to complete. Once it was all ground down, I used a lighter fiberglass to reglass it. There were also some voids along the chines, so I ground back both sides for the first four or so feet, and then reglassed this part as well.


Subscribe to:
Posts (Atom)