
Tuesday, May 3, 2011
Ready to Start Fairing
The boat is flipped, and there are just a few prep items that need to be taken care of. Should be able to start fairing this weekend.

Wednesday, April 20, 2011
Done with Glass!!!
My forearms could be in an Aveda ad. They are practically hairless due to the fact that every week for the past 6 months I have been ripping globs of cured epoxy off of them. Last week I finished glassing the boat. A rail was put around the boat to create the look of a cap, and also to hide the seam where the deck and hull come together. I sanded the edges down, and flattened everything out before glassing. I dry fit the glass as well as the peel ply, and then got to glassing. It went really easy this time. I used West Systems, which just made a really big difference. The other stuff I used is less expensive, and if I had it to do again, I would still use the cheaper stuff for mixing up cab when I need to adhere parts together, and to pull fillets. But when it comes to laying glass, I would use all West Systems. I would estimate that it would have taken me right at 4 gallons of the US Composites to wet out the top side of the boat, and it took about 2.5 gallons of West. The difference is pretty substantial.
Seth Vernon from Double Haul Guide Service, and Nick Balding from Balding Brothers Construction helped Beau and I lay the glass, which was a huge help. We knocked out the glass work in an hour, give or take.


Seth Vernon from Double Haul Guide Service, and Nick Balding from Balding Brothers Construction helped Beau and I lay the glass, which was a huge help. We knocked out the glass work in an hour, give or take.
 |
Ready for glass  |


Monday, April 4, 2011
Painting the Bilge
Took the deck back off the boat so the below deck areas could be painted. Painted with a gallon of Interlux paint for bilge painting. Used the mini grinder to rough up all surfaces before painting. The deck is solid under my weight, but when Beau stands on it, it flexes just a slight bit, so I decided to put two sets of additional supports between the stations on the bow deck. Also just the holes out for the drain holes, and Beau happened to have a stainless sink drain at the shop, which fit down perfectly. I think the drain will actually be really unique and also really functional.
 |
| Cross members to add support for the deck. |
 |
| Below deck areas painted. |
 |
| Drain hole with cover. |
Tuesday, March 29, 2011
March 29th
I took the weekend off from boat building in order to build a fence at the beach house at Ocean Isle Beach. Was ready to get back to the boat shop, so after my normal work day, I put in another 6 hours of boat building Monday night (got a phone call a little after midnight from a not so happy wife who woke up in the middle of the night to find she was sleeping alone). Sanded glass and then glassed in the cockpit deck. We had a really cold spell last night (down to the low 30s), so I waited for what seemed like forever for the fillets to kick. They were only partially kicked when I laid glass, but it still worked out fine.
The boat is getting to the point where you can really tell how she will look when finished. I had Beau help me with crowning out the deck in order to speed up the process. It would have taken me a good amount of time to think through it, and crown out each station, and he can do it by eye at this point. While he was crowning the stations to accept the deck, Mr. Reginold glassed the back sides of the panels that run along the chine between the front and aft deck. He grinded them down once they cured, so they are set to go. So, that was money well spent I think--probably saved me about a week's worth of build time.


The boat is getting to the point where you can really tell how she will look when finished. I had Beau help me with crowning out the deck in order to speed up the process. It would have taken me a good amount of time to think through it, and crown out each station, and he can do it by eye at this point. While he was crowning the stations to accept the deck, Mr. Reginold glassed the back sides of the panels that run along the chine between the front and aft deck. He grinded them down once they cured, so they are set to go. So, that was money well spent I think--probably saved me about a week's worth of build time.


Monday, March 14, 2011
Second Weekend in March
I can certainly feel the spring season on my heels, and it has given me even more motivation to get my rear end into the boat shop even more. Amazingly, my wife is still supportive at this point, but I know she has got to be looking forward to the completion date as much as I am.
I spent the better part of the weekend in the boat shop. Friday I put in three hours, Saturday 7 hours and Sunday 5 hours.
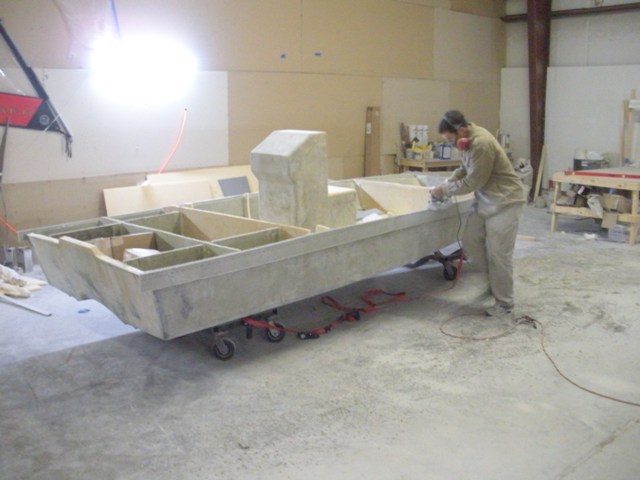
When I put on the spray rail, it raised the hull sides by about an inch and a half in the back of the boat, and three inches at the front. To compensate for this, I needed to raise the stations as well so that they'd be tall enough to accept the deck.
First I prepped all the surfaces by sanding it all down. Then I cut strips of 1/4 inch divinycell out of a sheet that I had already glassed on both sides. I screwed these strips in place on top of each of the stations. The I cut thicker blocks out of the glassed divinycell and used them to box the strips in place. Once everything was dry fitted I epoxied it in place, including the blocks, and I pulled fillets along the edges of all the blocks. Then I wet out some strips of glass that I had pre-cut for tabbing, and tabbed all the strips in place.
I also cut out the front and rear decks, and glassed one side of them with polyester resin.
The last vertical support is in place for the side decking that will run between the front and rear deck. I just glassed and tabbed it in one step.


I spent the better part of the weekend in the boat shop. Friday I put in three hours, Saturday 7 hours and Sunday 5 hours.
When I put on the spray rail, it raised the hull sides by about an inch and a half in the back of the boat, and three inches at the front. To compensate for this, I needed to raise the stations as well so that they'd be tall enough to accept the deck.
First I prepped all the surfaces by sanding it all down. Then I cut strips of 1/4 inch divinycell out of a sheet that I had already glassed on both sides. I screwed these strips in place on top of each of the stations. The I cut thicker blocks out of the glassed divinycell and used them to box the strips in place. Once everything was dry fitted I epoxied it in place, including the blocks, and I pulled fillets along the edges of all the blocks. Then I wet out some strips of glass that I had pre-cut for tabbing, and tabbed all the strips in place.
I also cut out the front and rear decks, and glassed one side of them with polyester resin.
The last vertical support is in place for the side decking that will run between the front and rear deck. I just glassed and tabbed it in one step.


Tuesday, March 8, 2011
Spray Rail
Last week I put on the spray rail. It was 5 inches in width, and yesterday it got planed down to be about 3 inches in the back. It made a huge difference in the profile of the boat, and should also make a huge difference in knocking down the spray the boat puts off while running. The rail raised the height of the hull sides from 16 to just over 18 inches at the transom, so the rails should also be high enough to where they will not cause noise against the water.
Really excited by the way that this turned out. I think it looks really sharp.
Really excited by the way that this turned out. I think it looks really sharp.
 |
| Grinding down the rails |
 | ||
Another angle - power planing 
|

Friday, February 25, 2011
Deck
Some pictures from the deck construction:
 |
| Preparing the stringers to accept the deck (the groove in the middle wasn't intentional--the router slipped). |
 |
| Deck in place and curing. The cups of water weighed it down and kept it in place while the epoxy kicked. |
 |
| Finished Deck |
 |
| View from Transom |
Subscribe to:
Posts (Atom)